Anycast Reverse Proxy with ExaBGP, USG and HAProxy
My background is as a systems dude. I’ve always wanted to be a network dude and I certainly know layer 2 stuff, IPv4 stuff, pretty well. When it comes to layer 3 networking though, my knowledge has always been vague. Probably fair to say the same for IPv6.. vague! So this “lab” is an opporuntity to learn a bit more about both of these topics. I guess like anything in this field, once you know a little bit about a piece of technolgy, you come to realise how much more there is to know. For me, BGP is that piece of technology.
The goal here is to move from a cluster based HAProxy setup for my Reverse Proxy to one based on Anycast and BGP Route Health Injection. Anycast is best described in this Cloudflare article. For my Home Lab use case, the idea here is to have a single IP address that is configured on multiple HAProxy servers and then using BGP route advertisements to ensure the “healthy” server receieves the traffic. Our HAProxy servers will have a tool called ExaBGP on them in order to speak BGP to the Firewall and advertise itself as a healthy route to the Anycast IP.
IPv6 SLAAC DAD
My original design had both reverse proxy servers living in the same layer 2 network. This was not a problem for IPv4 as the two hosts were happy to co-exist in the same broadcast domain without complaining about a conflict. However, part of the way that IPv6 SLAAC works is that whilst hosts can autoconfigure their own IP based on their Mac address, they also send out DAD requests onto the wire to try to make sure they are not conflicting with another device.
Design
After a fair bit of tinkering, I landed on the following design:
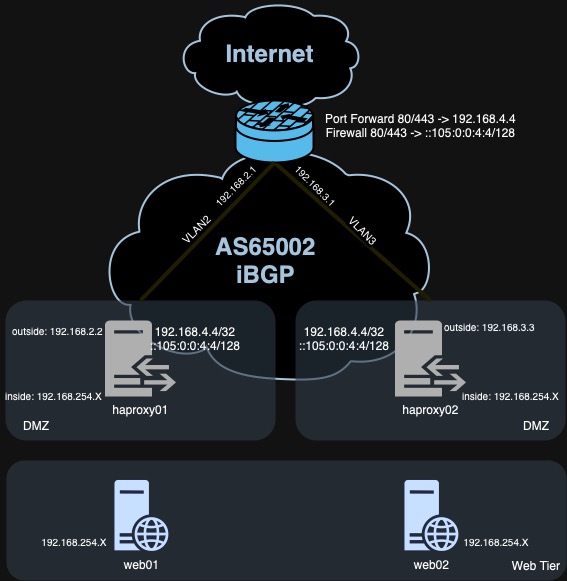
Pieces of the puzzle
- HAProxy on Debian 12 LXC (Proxmox)
- HAProxy Reverse Proxy config tested and working
- ExaBGP for route announcement ExaBGP Project
- Unifi USG Pro 4
- Unifi Controller / Network Application + config.gateway.json How-to article for config.gateway.json
Host Configuration
External Edge
The external interface on both haproxy nodes has a layer 2 link to the firewall. This link is the default gateway on those nodes. It is also the layer 3 link with the firewall to advertise the IPv4 and IPv6 Anycast addresses.
For IPv4, we staticly assign the interface address and the Anycast address.
For IPv6, we configure the nodes to accept router advertisements so that there is IPv6 connectivity that can be used for routing IPv6 traffic to the IPv6 Anycast address.
Internal Edge
For the internal interfaces, we have one that lives in the same layer 2 network as most of the workloads we are proxying. We also have an interface in the Proxmox SDN network so that we can keep that traffic from hairpinning via the firewall unnecessarily. A static route is also required for the other SDN IPv4 range.
Interfaces
hap01
| edge | bridge | iface | VLAN | IPv4 | IPv6 | Comments |
|---|---|---|---|---|---|---|
| ext | vmbr0 | eth0 | 2 | 192.168.2.2/24 | accept_ra 2 | Accept router advertisements and enable IP forwarding |
| int | vmbr0 | eth0 | 2 | 192.168.4.4/32 | 2406:3400:658:105::4:4/128 | Our IPv4 and IPv6 Anycast IP Addresses |
| int | vmbr0 | eth1 | - | 192.168.254.202/24 | ||
| int | vxlan0 | eth2 | - | 10.100.0.2/24 | Add static routes to the other SDN network to avoid hairpinning |
hap02
| edge | bridge | iface | VLAN | IPv4 | IPv6 | Comments |
|---|---|---|---|---|---|---|
| ext | vmbr0 | eth0 | 3 | 192.168.3.3/24 | accept_ra 2 | Accept router advertisements and enable IP forwarding |
| int | vmbr0 | eth0 | 3 | 192.168.4.4/32 | 2406:3400:658:105::4:4/128 | Our IPv4 and IPv6 Anycast IP Addresses |
| int | vmbr0 | eth1 | - | 192.168.254.203/24 | ||
| int | vxlan0 | eth2 | - | 10.100.0.3/24 | Add static routes to the other SDN network to avoid hairpinning |
NIC Configuration Files
hap01: /etc/network/interfaces
    auto lo
    iface lo inet loopback

    auto eth0
    iface eth0 inet static
        address 192.168.2.2/24
        gateway 192.168.2.1

    iface eth0 inet static
        address 192.168.4.4/32

    iface eth0 inet6 auto
            accept_ra 2
            # Add additional IPv6 addresses when $IFACE goes up
            up ip -6 addr add 2406:3400:658:105::4:4/128 dev $IFACE
            # Remove them when $IFACE goes down
            down ip -6 addr del 2406:3400:658:105::4:4/128 dev $IFACE

    auto eth1
    iface eth1 inet static
        address 192.168.254.202/24

    auto eth2
    iface eth2 inet static
        address 10.100.0.2/24
        # Add SDN route on interface up
        up ip route add 10.100.50.0/24 via 10.100.0.1 # <-- this could be replaced with a BGP route announcement from the firewall.
        # Remove SDN route on interface down
        down ip route del 10.100.50.0/24 via 10.100.0.1
    ```

hap02: /etc/network/interfaces
    ```conf
    auto lo
    iface lo inet loopback

    auto eth0
    iface eth0 inet static
        address 192.168.3.3/24
        gateway 192.168.3.1

    iface eth0 inet static
        address 192.168.4.4/32

    iface eth0 inet6 auto
            accept_ra 2
            # Add additional IPv6 addresses when $IFACE goes up
            up ip -6 addr add 2406:3400:658:105::4:4/128 dev $IFACE
            # Remove them when $IFACE goes down
            down ip -6 addr del 2406:3400:658:105::4:4/128 dev $IFACE

    auto eth1
    iface eth1 inet static
        address 192.168.254.203/24

    auto eth2
    iface eth2 inet static
        address 10.100.0.3/24
        # Add SDN route on interface up
        up ip route add 10.100.50.0/24 via 10.100.0.1 # <-- this could be replaced with a BGP route announcement from the firewall.
        # Remove SDN route on interface down
        down ip route del 10.100.50.0/24 via 10.100.0.1
    ```

#### Linux Kernel

Enable Linux IPv4 and IPv6 forwarding on both HAProxy nodes.

`cat /etc/sysctl.conf`

```conf
net.ipv4.ip_forward=1
net.ipv6.conf.all.forwarding=1
ExaBGP
ExaBGP is an awesome tool and does a heap of clever things. Fundamentally though, it is a BGP Client for Linux that you can use to speak to other things that talk BGP such as Routers, Firewalls, Load Balancers and in our case, the Unifi Security Gateway. Quite often, ExaBGP is used both for speaking BGP with Peers AND reconfiguring the local routing table on the host based on any BGP routes that it receices. Our case is slightly simpler though - we don’t need to reconfugure the local routing table based on route announcements (although I guess we could, see note below), we simply want to advertise ourselves as a viable route to each of the Anycast IP addresses.
Note: An enhancement I might make here is for the Firewall to advertise the Proxmox SDN routes to our HAProxy nodes. This would save us having to configure a static route to the other SDN IP range
Installation
As noted on their GitHub page ExaBGP, some common Linux distro’s contain the ExaBGP package in their standard repo’s.
On Debian, install with sudo apt install exabgp.
Configuration
Referring to our diagram above, we want to configure ExaBGP to talk iBGP to the firewall using the same AS number 65002. To configure this, we add the following config to the /etc/exabgp/exabgp.conf file:
neighbor 192.168.2.1 {
	router-id 192.168.2.2;
	local-address 192.168.2.2;
	local-as 65002;
	peer-as 65002;
	family {
		ipv4 unicast;
		ipv6 unicast;
	}
}
neighbor 192.168.2.1- this is the IP of the firewall on this layer 2 segment. Our BGP Peer.router-id- this is the IP that we will be configuring as the neighbour on the Firewall side.local-address- this is explicitly telling ExaBGP which local IP we want to use to talk BGP with.local-as- The Autonomous System Number (ASN) that we are advertising our routes to.peer-as- The Peer AS is the same as local as because we are using iBBP.family {}- This configuration allows us to advertise both IPv4 and IPv6 routes.
Note: To all the BGP experts out there, apologies if I have completely mangled this explanation! :)
Now lets re-read the ExaBGP configuration and start / restart the ExaBGP daemon.
sudo systemctl daemon-reload
sudo systemctl restart exabgp.service
sudo systemctl enable exabgp.service # Make sure it is configured to start on system boot.
Ok so at this point, we have enough configuration to establish a BGP session with the firewall however we are not yet advertsing any routes. We will come back to route advertisement but now, lets configure the Firewall (USG) so that the BGP session can be established between the two BGP peers.
Unifi Security Gateway Config
Unfortunately the USG doesn’t provide a UI interface to configure advanced routing such as BGP so we going to need to use our old favourite config.gateway.json. To start with though, we will simply ssh to our USG and configure it from the CLI to talk BGP and test that its all working. Remember these CLI changes won’t persist through a reboot or re-provision.
> ssh admin@gateway.local

# Enter Configuration mode
configure
BGP Peering
Firstly, lets configure our first peer relationship with hap01 on 192.168.2.2 in AS 65002
set protocols bgp 65002 neighbor 192.168.2.2
set protocols bgp 65002 neighbor 192.168.2.2 remote-as 65002 # iBGP so same AS as peer
set protocols bgp 65002 neighbor 192.168.2.2 soft-reconfiguration inbound # Allows IPv4 routes receieved from this peer to be propogated to our routing table.
set protocols bgp 65002 neighbor 192.168.2.2 address-family ipv6-unicast soft-reconfiguration inbound # Allows IPv6 routes receieved from this peer to be propogated to our routing table.
And now our first peer relationship with hap02 on 192.168.3.3 in AS 65002
set protocols bgp 65002 neighbor 192.168.3.3
set protocols bgp 65002 neighbor 192.168.3.3 remote-as 65002 # iBGP so same AS as peer
set protocols bgp 65002 neighbor 192.168.3.3 soft-reconfiguration inbound # Allows IPv4 routes receieved from this peer to be propogated to our routing table.
set protocols bgp 65002 neighbor 192.168.3.3 address-family ipv6-unicast soft-reconfiguration inbound # Allows IPv6 routes receieved from this peer to be propogated to our routing table.
Then to save and apply this config
commit
save
exit # <-- to drop out of configure mode
Now from the CLI, you should be able to see that your BGP session with 192.168.2.2 is established.
> show ip bgp neighbors 192.168.2.2
BGP neighbor is 192.168.2.2, remote AS 65002, local AS 65002, internal link
  BGP version 4, remote router ID 192.168.2.2
  BGP state = Established, up for 00:00:33 # <-- state = Established, looking good!
  Last read 00:00:33, hold time is 180, keepalive interval is 60 seconds
  Neighbor capabilities:
    4 Byte AS: advertised and received
    Route refresh: advertised
    Address family IPv4 Unicast: advertised and received
    Address family IPv4 Multicast: received
    Address family VPNv4 Unicast: received
    Address family IPv6 Unicast: received
    Address family IPv6 Multicast: received
    Address family Unknown: received
  Message statistics:
    Inq depth is 0
    Outq depth is 0
                         Sent       Rcvd
    Opens:                  1          0
    Notifications:          0          0
    Updates:                3          1
    Keepalives:             2          0
    Route Refresh:          0          0
    Capability:             0          0
    Total:                  6          1
  Minimum time between advertisement runs is 5 seconds

 #...suppressed output...
Repeat the above to confirm the peering relationship with 192.168.3.3.
To view the information about the peering relationship from the ExaBGP side:
ssh user@192.168.2.2 # hap01
sudo exabgp-cli show neighbor summary
Peer            AS        up/down       state          |     #sent     #recvd
192.168.2.1     65002   0 days, 0:00:33 established           4         18
Route Filtering
At this point, the HAProxy nodes and the USG are have a peering relationship and the USG is ready to accept routes. One issue though, is that the USG is happy to accept ANY routes that we send to it which is a bad thing. We could mess with our Internal network routing accidentally by sending a bogus route to the USG telling it to route traffic to us that it should not. In a Home Lab not a big deal, in production a definite no-no. We would have the same problem on the ExaBGP side except that remember, in our case, ExaBGP might receieve routes from its BGP Peer, but it is not configured to install those routes into a routing table. Additionally, as its not the core router for this network, the potential damage for route leaking this way is minimal.
The way to ensure the USG only accepts the routes that we want it to is to configure Prefix Lists and apply them to our Peers. The Prefix Lists include the prefixes we want to receieve from our peer.
configure

set policy prefix-list HAPROXY-IN

set policy prefix-list HAPROXY-IN rule 5000
set policy prefix-list HAPROXY-IN rule 5000 action permit
set policy prefix-list HAPROXY-IN rule 5000 description "Accept only single IPv4 Anycast route from ExaBGP"
set policy prefix-list HAPROXY-IN rule 5000 prefix "192.168.4.4/32"

set policy prefix-list HAPROXY-IN rule 5050
set policy prefix-list HAPROXY-IN rule 5050 action permit
set policy prefix-list HAPROXY-IN rule 5050 description "Accept only single IPv6 Anycast route from ExaBGP"
set policy prefix-list HAPROXY-IN rule 5050 prefix "2406:3400:658:105::4:4/128"
Now we apply prefix list to our neighbor configuration:
set protocols bgp neighbor 192.168.2.2 prefix-list import HAPROXY-IN # <-- hap01
set protocols bgp neighbor 192.168.3.3 prefix-list import HAPROXY-IN # <-- hap01
Ok, the USG is ready. Lets send it some routes.
ExaBGP Route Announcement
Back on the HAProxy nodes, we can use the exabgp-cli to update the BGP config on the fly and announce our Anycast routes.
> ssh user@192.168.2.2
sudo exabgpcli neighbor 192.168.2.1 announce route 192.168.4.4/32 next-hop 192.168.2.2
sudo exabgpcli neighbor 192.168.2.1 announce route 2406:3400:658:105::4:4/128 next-hop 2406:3400:658:114:be24:11ff:feda:1670
neighbor- the USG, our BGP peerroute- the Anycast IP that we are telling it we are hostingnext-hop ...- the IP address of the interface to which to send the layer 3 traffic for the Anycast address for forwarding
# And to check that you have succeeded, you can tail the exabgp log
sudo journalctl -xeu exabgp.service -f
To check on the USG that it is seeing these routes, use the command:
>show ip bgp neighbors 192.168.2.2 received-routes
BGP table version is 0, local router ID is 192.168.254.1
Status codes: s suppressed, d damped, h history, * valid, > best, i - internal,
              r RIB-failure, S Stale, R Removed
Origin codes: i - IGP, e - EGP, ? - incomplete

   Network          Next Hop            Metric LocPrf Weight Path
*> 192.168.4.4/32   192.168.2.2            100    100      0 i

Total number of prefixes 1
And to check that it is being isntalled in our routing table:
> show ip route
Codes: K - kernel route, C - connected, S - static, R - RIP, O - OSPF,
       I - ISIS, B - BGP, > - selected route, * - FIB route

S>* 0.0.0.0/0 [1/0] is directly connected, pppoe0
C>* 10.10.0.2/32 is directly connected, vtun64
C>* 10.64.0.0/24 is directly connected, eth0.64
C>* 10.192.0.0/18 is directly connected, eth0.192
C>* 10.254.0.0/26 is directly connected, eth0.254
C>* 127.0.0.0/8 is directly connected, lo
S>* 192.168.1.0/24 [30/0] is directly connected, vtun64
C>* 192.168.2.0/24 is directly connected, eth0.2
C>* 192.168.3.0/24 is directly connected, eth0.3
B>* 192.168.4.4/32 [200/100] via 192.168.2.2, eth0.2, 4d06h05m
C>* 192.168.254.0/24 is directly connected, eth0
C>* 220.233.1.68/32 is directly connected, pppoe0
Note the B prefix to the 3rd last route. That indicates the route originated from BGP - looking good!
Can we ping the IPv4 Anycast address?
> ping 192.168.4.4
PING 192.168.4.4 (192.168.4.4) 56(84) bytes of data.
64 bytes from 192.168.4.4: icmp_req=1 ttl=64 time=0.228 ms
64 bytes from 192.168.4.4: icmp_req=2 ttl=64 time=0.190 ms
64 bytes from 192.168.4.4: icmp_req=3 ttl=64 time=0.182 ms
We can also check that we’re receiving the IPv6 Anycast prefix:
> show ipv6 route
Codes: K - kernel route, C - connected, S - static, R - RIPng, O - OSPFv3,
       I - ISIS, B - BGP, * - FIB route.

K>* ::/0 via fe80::6600:f1ff:fe9e:1e00, pppoe0
S   ::/0 [1/0] is directly connected, pppoe0
C>* ::1/128 is directly connected, lo
C>* 2406:3400:600:68:8c95:f17:15b4:20bf/128 is directly connected, pppoe0
C>* 2406:3400:658:102::/64 is directly connected, eth0.254
C>* 2406:3400:658:103::/64 is directly connected, eth0
C>* 2406:3400:658:104::/64 is directly connected, eth0.192
B>* 2406:3400:658:105::4:4/128 [200/0] via 2406:3400:658:114:be24:11ff:feda:1670, eth0.2, 00:00:25
C>* 2406:3400:658:114::/64 is directly connected, eth0.2
C>* 2406:3400:658:11e::/64 is directly connected, eth0.3
C>* fe80::/10 is directly connected, pppoe0
C * fe80::/64 is directly connected, eth0.254
C * fe80::/64 is directly connected, eth0.2
C * fe80::/64 is directly connected, eth0.3
C * fe80::/64 is directly connected, eth0.64
C * fe80::/64 is directly connected, eth0.192
C * fe80::/64 is directly connected, eth2
C>* fe80::/64 is directly connected, eth0
Once again, note the BGP route that is prefixed with B.
And let’s test that it is pinging…
> ping6 2406:3400:658:105::4:4
PING 2406:3400:658:105::4:4(2406:3400:658:105::4:4) 56 data bytes
64 bytes from 2406:3400:658:105::4:4: icmp_seq=1 ttl=64 time=0.457 ms
64 bytes from 2406:3400:658:105::4:4: icmp_seq=2 ttl=64 time=0.222 ms
64 bytes from 2406:3400:658:105::4:4: icmp_seq=3 ttl=64 time=0.831 ms
Yew! Looking good :)
Next steps
I’ve run out of steam for now. Next steps:
- Port forwarding HTTP and HTTPS for IPv4 access
- Firewall rule for HTTP and HTTPS for IPv6 access
- Making the config permanent on USG and ExaBGP
- CI/CD Pipeline Deployment
- Enhancements and optimisations
Coming soon! 🤝
Credits and Useful Links
I did lots of reading prior to starting this project and the inspiration came from a couple of key articles penned by others.
Anycast / BGP / Unifi
IPv6 Reading
- https://www.techtarget.com/iotagenda/definition/IPv6-address
- https://blogs.infoblox.com/ipv6-coe/back-to-basics-the-ipv6-address-types-part-3/