Last modified at

802.11b PVC Bazooka-Style Yagi
The hax0red up way
This is still in beta alpha version 0.11ab, please send bug reports to tux@lunix.net
Why?
We wanted to connect our houses using Enterasys 802.11b 11MBit wireless cards.
The reason: Quake, wireless gisbon hax0ry and Broadband Internet.
The Nuts and Bolts of it
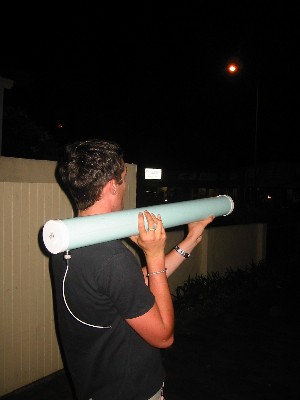
Given the excess of foliage in the line of sight between our two houses, we decided that two Yagi's, one at each end, would be better than one. I would suggest making two even if you don’t need the second because its really not that expensive to buy the parts and you can always flog the second one on overclockers or ebay or something.
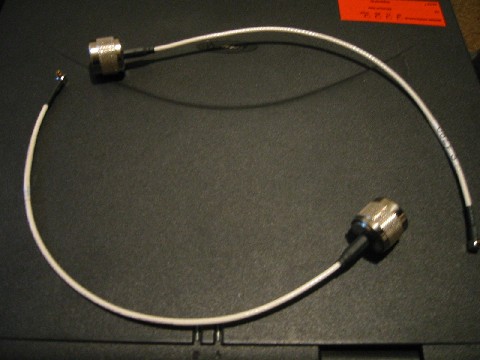
Disclaimer: At this point, might be a good idea to warn you of some things that we didn’t realise straight out. Pigtails and extension cable cost a shitload of money so although you don’t have to outlay that much cash on the Yagi itself, be prepared to have to blow the budget later on in the project. Pigtails $50AU ea, Extension cable $100AU 10M.
Ingredients:
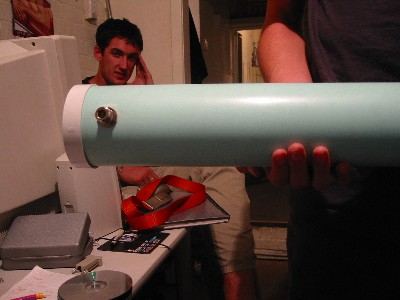
2 metres 3” diameter PVC pipe (obviously you’ll need half as much if your just making 1)
2 x 3’ all thread bolts, ¼” diameter
8 x nuts, to fit all thread
36 x 1½” diameter, ¼” hole washers. Best if they fit snugly around all-thread but not essential. (These were a pain in the arse to find. If your in AU, Marlows is a good source. Your local hardware store is prolly likely to have them but not in such a large quantity).
4 x PVC end caps, 3” diametre. Flat ones are the best.
6’ of Aluminium tube that fits around the all-thread. Doesn’t need to be too snug.
2 x female N-Type connectors. Match the pigtail adapter. Buy the ones that look easiest to mount. We had screw on ones and they were all good.
1 x little piece of Brass (almost wire but not) that fits inside the brass for the N-Type. Doesn’t actually need to fit cos you can solder it on but if it does it makes life a little easier.
2 x Tin Coffee lids. We found Bushels ones were good because they fitted inside the PVC end cap and on the end of the pipe nicely. I think with a reflector anything goes, just has to be flat and silvery (i could be wrong). Trial and error is the go!
1 x 7" by 7" sheet of acrylic/plastic. Needs to be reasonably thick (1/8").
Photos (more to come)

Putting it Together
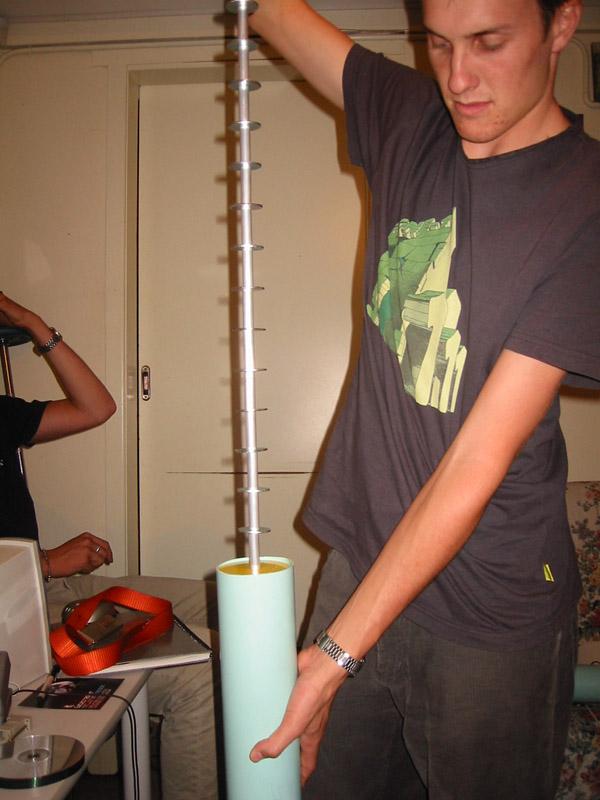
Step 1: Cut your aluminium tube into lenghts of 1.75" or as close to this as possible. Its a good idea to file them down as smooth and as flat as possible on the ends. You need 30 all up, 15 for one.
Step 2: Cut 4 disks from your plastic/acrylic sheet. Just a bit less than 3" in diametre so that they fit inside the PVC tube. Drill a 1/4" hole in the middle of all of the disks. (These are used to hold the all-thread in the centre of the tube). Its hard to do this neatly but just as best you can.
Now you can assemble the inner workings of the yagi. Start with a nut screwed on from one end aproximately 1" from the end of the all-thread. Then put on one of your acrylic disks, then piece of tubing, then washer, then tube then washer until you run out.
Step 3: Start with a nut screwed on from one end aproximately 1" from the end of the all-thread.
Step 4: Now slide on one of your acrylic disks, then piece of tubing, then washer, then tube then washer until you have put on 15 pieces of tubing.
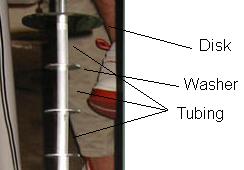
Step 5: After the last piece of tube, put on a second acrylic disk with a nut to hold all the bits in place.
The Internal structure of the Yagi is complete. Now we have to enclose it in the PVC and add our female N-Connector.
Step 6: Now, take one of your PVC end caps and drill a 1/4" diametre hole in the middle of it. Using two nuts, one on either side, affix the end cap to the end of the all-thread (not the end where you put the first nut) about 2" from the end (Eek, that was confusing).
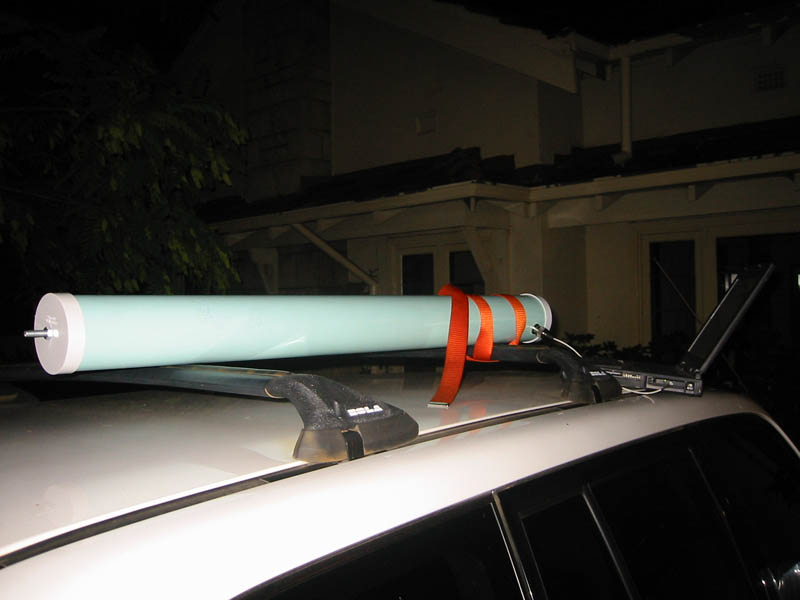
Step 7: Cut your large piece of PVC pipe so that it is the same length as your all-thread + about 2 - 3" for your N-Connector and reflector.
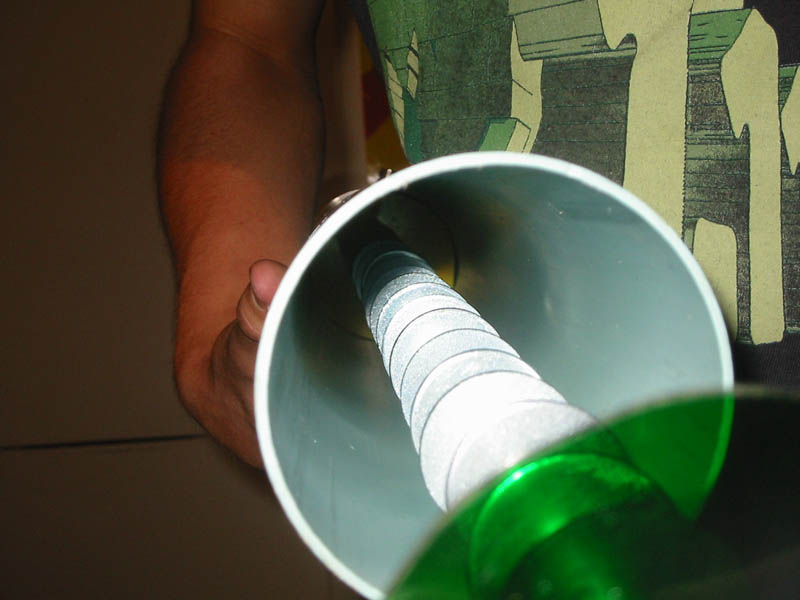
Step 8: Assemble your N-Connector and Brass tubing. To do this cut the brass to about 1.5" (so it protrudes for half the diametre of the PVC) and attach via solder or other means to the N-Connector. i.e...
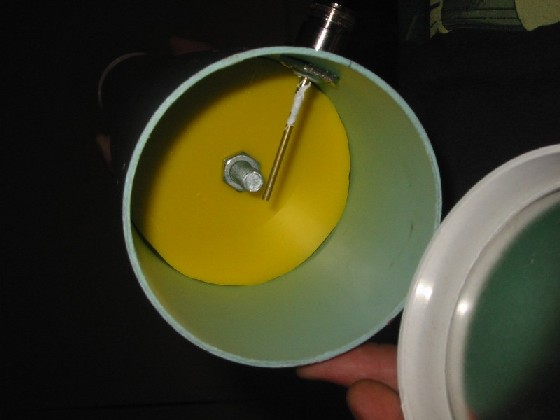
Step 9: Attach the N-Connector + Brass tube to the PVC as in the picture above. The way of doing this will be different depending upon which N-Connector you get but should be pretty straight forward.
Step 10: For the reflector, we used a Bushels coffee tin lid which fitted perfectly inside the PVC end cap and thus all we needed to do was sit it on there and we were done. Putting the reflector together may require you to be somewhat inventive so don't be affraid to experiment.
Tweaking for best performane (The antenna, not your girlfriend :p)
Once again, experimentation is what is required here. In order to tweak the yagi tho, basically you can just adjust the nuts around the PVC end-cap at the business end (not the reflector end) and move the all-tread closer of further from the brass tubing at the other end. I know this also is a bit confusing but once you build it you will understand. Experimentation with different reflectors and possibly even different metals for the internals of the yagi may also increase performance.
We were of course pretty lucky in that ours worked first go but don't give up if yours don't. Once you do get it working, the effort is every bit worth it!
Acknowledgements:
As you read at the top of this page, this is our hax0red up version of a few peoples completely un-hack like research and design. I would like to acknowledge those guys here as it was the information that they provided that helped us understand what the hell we were doing.
Andrew S. Clapp - http://www.netscum.com/~clapp/wireless.html - This site is really good at explaining the physics principals behind the yagi design. Check it out!
Rob Flickenger - http://www.oreillynet.com/cs/user/view/wlg/448 - This is the original Pringles can yagi. Also, check out Rob's book Building Wireless Community Networks.
Seattle Wireless - http://www.seattlewireless.net/index.cgi/DirectionalYagi - Our design also takes some ideas from these guys too. Also check out Seattle Wireless's main site. They are doing some really interesting stuff!